
iOS API Tutorial
Bistri API – iOS tutorial
Device compatibility
The most popular ARMv7 architecture is supported.
Prerequisites
- Download Bistri SDK from this page
- You must have created an application on the Bistri Developers portal in order to get your personal API keys. If you don’t already have a developer account, you can freely create one at the following address: https://api.developers.bistri.com/signup
In the ‘referrer filters’ section of your application in your developer’s dashboard, don’t forget to specify your application Bundle Identifier. For instance, ‘com.bistri.api_demo’ for Bistri demo application. Without this information, your application won’t run.
- Create a new iOS project using Xcode then follow the instructions described below to configure your project:
- Copy the sdk/bistri directory from the downloaded archive to your project directory, so you have now a directory under your project directory named ‘bistri’ that contains all Bistri files (*.h and *.a)
- Select your target in your project navigator
- Open the ‘General’ tab and set the ‘Linked Frameworks and Libraries’
- Add the libbistriapi.a from $PROJECT_DIR/bistri
- Add libstdc++.dylib library
- Add libsqlite3.dylib library

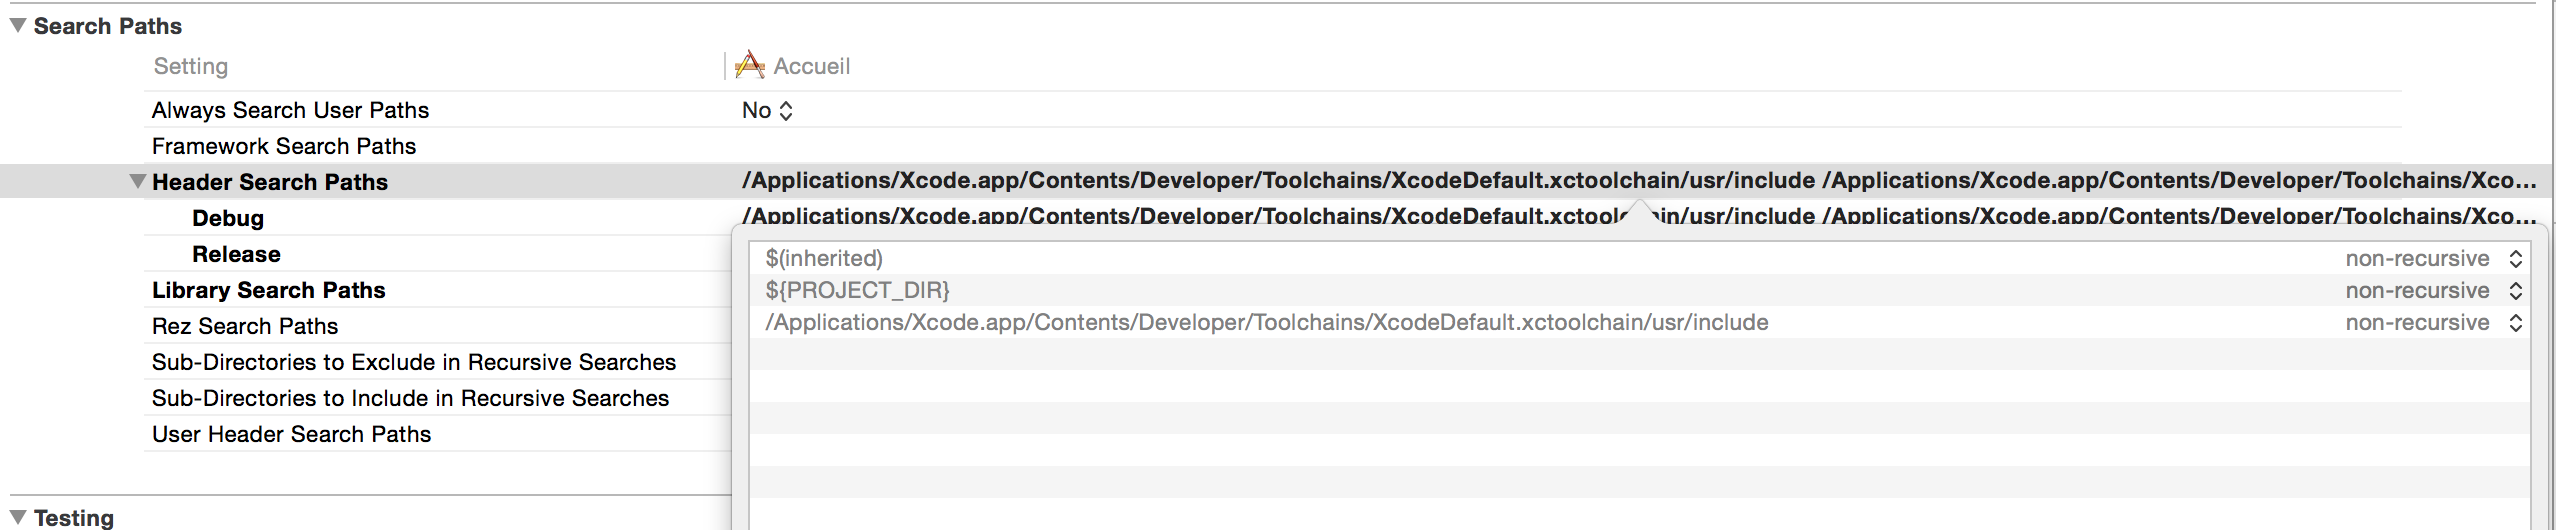
- Open the ‘Build Settings’ tab and set the ‘Header Search Paths’ in the ‘Search Paths’ section
- Add ‘${PROJECT_DIR}’
Add bistri conference API into your application
import "bistri/conference.h"
To get or create a bistri conference instance call, you’ll add ConferenceDelegate to your AppDelegate interface.
@interface AppDelegate : UIResponder< ConferenceDelegate, UIApplicationDelegate />
Configure API
[ self.conference setInfoWithAppID: @"38077edb" /* application ID */ APIKey: @"4f304359baa6d0fd1f9106aaeb116f33" /* application Key */ userName: @"iosDemo" /* user Name */ ];
Open/close a session on the server
connect to open a session and disconnect to close it.Once the connection is established the
onConnectionEvent method of conference event listener is invoked.
    self.conference = [ Conference getInstance ];
    [ self.conference setDelegate:self];
    [ self.conference setInfoWithAppID: @"38077edb" APIKey: @"4f304359baa6d0fd1f9106aaeb116f33" userName: @"iosDemo" ];
    [ self.conference connect ];

    ....

- (void)disconnect {
    [ self.conference disconnect ];
}

- (void)onConnectionEvent:(Connection)status {
    NSString* statusString = @"Unknown";
    switch ( status ) {
        case DISCONNECTED:
            statusString = @"DISCONNECTED";
            break;
        case CONNECTING:
            statusString = @"CONNECTING";
            break;
        case CONNECTING_SENDREQUEST:
            statusString = @"CONNECTING_SENDREQUEST";
            break;
        case CONNECTED:
            statusString = @"CONNECTED";
            break;
    }

    NSLog(@"onConnectionEvent status:%@", statusString);
}
Conference event delegate
- (void)onConnectionEvent: (Connection)status;
- (void)onError: (Error)error;
- (void)onRoomJoined: (NSString*)roomName;
- (void)onRoomQuited;
- (void)onNewPeer: (PeerStream*)peerStream;
- (void)onRemovedPeer: (PeerStream*)peerStream;
- (void)onPresence: (NSString*)peerId presence:(Presence)presence;
- (void)onIncomingRequest: (NSString*)peerId name:(NSString*)peerName room:(NSString*)room callEvent:(NSString*)event;
- (void)onRoomMembers: (NSString*)room members:(NSArray*)members;
JOIN/QUIT A ROOM
joinRoom method with the desired room name. Rooms are virtual “meeting points”. This is the place to join, where other users are connected.
- (void)join: (NSString*) room{
    [self.conference join:room];
}
To quit a room, use leaveRoom.
- (void)leave: (NSString*) room{
    [self.conference leave:room];
}
Display video stream
PeerStream object.This object is used to handle a
MediaStream object.When a
PeerStream is available, the event onNewPeer delegate is called, with the PeerStream as a parameter.When a
PeerStream is destroyed, the event onRemovedPeer delegate is invoked.
To know the owner of a given PeerStream, call [ peerStream getId ].
When a MediaStream is available, the event onMediaStream of PeerStreamDelegate is called.
A MediaStream contains audio and/or video.
To know if a MediaStream contains video, you can call the method hasVideo
- (void)onNewPeer:(PeerStream *)peerStream {
    NSLog( @"onNewPeer peer id:%@", [ peerStream getId ] );
    [peerStream setDelegate: self];
}

- (void)onRemovedPeer:(PeerStream *)peerStream {
    NSLog( @"onRemovedPeer peer id:%@", [ peerStream getId ] );
}

- (void)onMediaStream:(MediaStream *)mediaStream peerId:(NSString *)peerId {
    NSLog( @"onMediaStream peer id:%@", peerId );

    [self addMediaStream:mediaStream];
}

- (void)addMediaStream: (MediaStream*)mediaStream {
    NSLog(@"addMediaStream pid:%@", [ [mediaStream getPeerStream] getId ] );

    [mediaStreams setObject:mediaStream forKey:[ [mediaStream getPeerStream] getId ] ];
    mediaStream.delegate = self;

    [self resizeVideoViews];

    [self.videoView addSubview:[ [ mediaStream getVideoView ] getView] ];
}
DataChannels
- (void) openDataChannel:(NSString*)peerId withLabel:(NSString*)label inRoom:(NSString*)roomName;
Send data using
- (void) send:(NSString*)message;
Close the DataStream using
- (void) close;
See documentation for more details about DataStream
Video/Audio options
Use
- (void) setVideoOption:(VideoOption)option withIntgValue:(int)value; to set a video option:
[self.conference setVideoOption:MAX_WIDTH withIntgValue:640];
and - (void) setAudioOption:(AudioOption)option withCodecValue:(AudioCodec)value; to set audio option:
    [self.conference setAudioOption:PREFERRED_CODEC withCodecValue:OPUS];
    [self.conference setAudioOption:PREFERRED_CODEC_CLOCKRATE withIntValue:44000];
For instance, it is possible to set the video size of a video capture.
See documentation for more details about available options
Background
In this case, you need to configure your application to inform the system to keep your application opened. Please, follow these steps to configure your application:
1. Add the following methods in your main app delegate’s methods:
- (void)applicationDidEnterBackground:(UIApplication*)application {
	[ self.conference applicationInBackground ];
}

- (void)applicationWillEnterForeground:(UIApplication*)application {
}

- (void)applicationDidBecomeActive:(UIApplication*)application {
    [ self.conference applicationIsActive ];
}
With the methods, the Bistri’s APIs will know how to manage background communications
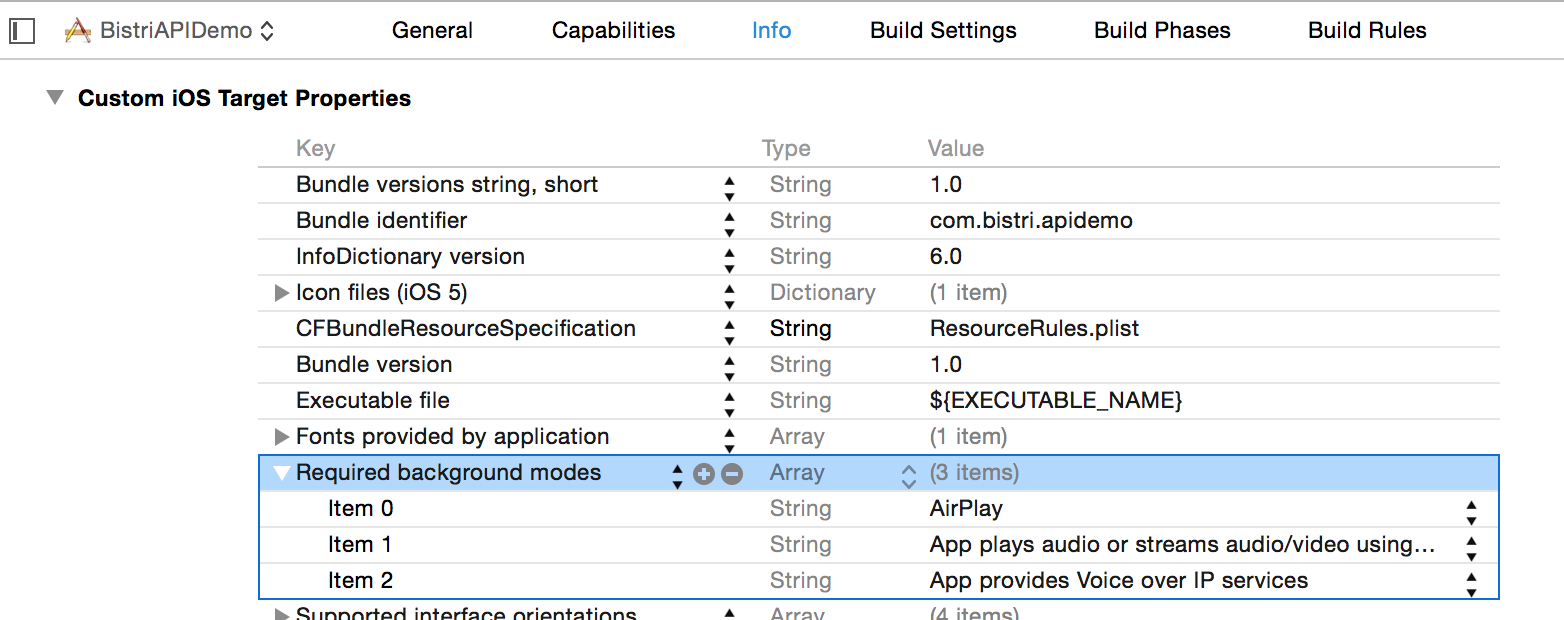
2- To get your app running in background, you need to add the “App provides Voice over IP services” background mode to your Info.plist. “AirPlay and “App plays audio or streams audio/video using AirPlay” can be useful too if you want to allow a conversation in background mode.
Be careful, Apple can reject your application if you don’t set it up correctly or if your application isn’t a VoIP application: Background Execution Guide